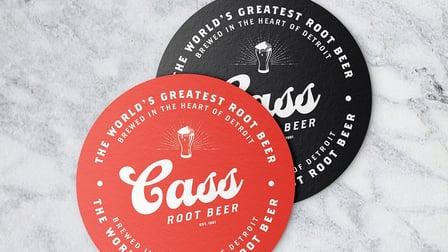
In this tutorial, I go over how to set up a document and create a retro-themed coaster in #Adobe InDesign. Topics covered in this lesson include using the Type on a Path Tool, how to add a vector icon and proper placement of a logo in the middle of the coaster.
Project Description
This specific project calls for a 3.88" X 3.88" document. I used a template with a bleed and crop marks to make it easier when designing.
Let's get started with the Type on a Path Tool, which allows you to type text on a shape, line or path. In this case, we'll use the Type on a Path Tool to create our brand messaging on the coaster.
Type on a Path Tool
- Create an Ellipse shape and hover of the top area using the Type on a Path Tool. This can be accessed by left-clicking the Type Tool and holding for the flyout. Shift + T will also launch the Type on a Path Tool.
- When you see a + icon next to your cursor click and begin to type the text you would like. With the Selection Tool, use the adjustment handles to left, centre and right of the text frame to properly align your text.
- Select the text and go to Type > Type on a Path > Options.
- In this dialog box, change the default alignment from Baseline to Ascender and click OK.
- With the text frame still selected, go to Edit > Copy and then Edit > Paste in Place. Hover over the right-hand corner and while holding shift, rotate the box 108 degrees so the text is now on the bottom as well.
- Double-click the bottom frame and select the text. Repeat the same process as Step 4, only this time, change the alignment from Ascender to Descender and check the Flip option to rotate the text orientation. The result is both the top and bottom text paths align together and create the start of visually compelling badge logo.
Exporting Work
- To export your work before printing, make your way to File > Export and select PDF (Print) in the file format dropdown. Click Save.
- This brings up PDF exporting options, where you can alter different settings for printing purposes. When complete, finalize exporting the file. This is what you will send to printer.
Go to Class
MOOC List is learner-supported. When you buy through links on our site, we may earn an affiliate commission.