MOOC List is learner-supported. When you buy through links on our site, we may earn an affiliate commission.
MOOC List is learner-supported. When you buy through links on our site, we may earn an affiliate commission.
Prerequisites: Basic knowledge in how to use one of the following: Inkscape, Microsoft Publisher or InDesign as well as some painting experience.
Skills to be learned:
- Drafting signs: plan out what your sign should contain, making sure your sign is balanced easy to read and visual appealing
- Template creation: create a digitized template of your sign to use as a template (This will be done using Inkscape but can also be done with Microsoft Publisher or InDesign)
- Transferring: putting your template on your sign board
- Sign painting: Tips and tricks on how to paint your sign using paint brushes or paint markers and how to seal your paint.
Class Project Overview
Throughout this class you will be creating a sign of your own.
- Your sign will be painted on a material of your choice, I would recommend for your first project that you choose a material that is readily available to you that does not warp with the absorption of liquid. Ex) wood or a foam board (presentation board) make sure your sign surface is matte and can absorb liquid or provide a surface for paint to cling to (no glossy surfaces)
- Your sign will include text of your choosing which will be painted on with paint brushes or paint markers.
Materials needed
- Sign board (wood, plastic with a matte finish, dense cardboard or foam board with a non glossy finish)
- Pencil
- Paper
- Transfer paper (black or white depending on the color of your sign board, I usually paint on a black surface so I use Saral white transfer paper)
- Paint (you can use Acrylic or chalk paint, in ink or pen form)
- Paint brushes, I like to use one fine tip for details and one angled wider(3/8in) flat brush for filling in larger spaces ( I recommend that you have paint brushes even if you are planning on using paint pens)
- Rinse water
- Clean paper towel or rag for cleaning your brushes
- Q-tips (for touch ups)
- Ammonia (for touch ups when using chalk paint)
- Sealant (used for outdoor signs or signs that may be exposed to moisture) I use an acrylic spray sealant with a matte finish, this works great with acrylic paint, I recommend that if you want to seal chalk paint that you do a test run to make sure the sealant does not cause the paint to bleed. Depending on the type of chalk paint an acrylic sealant will work.
Your project will include:
Sketching a draft of your sign.
Creating a digitized template which you will use to create your sign.
Your finished sign
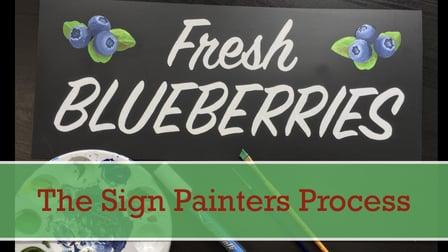
Your finished project will be a beautiful sign customized to its purpose, hand painted, easy to read and ready for hanging. If you would like you are free to make your own "fresh blueberry" sign following along with the one I am making throughout this class.
I encourage you to share each part of your project in the class project gallery as you create your sign. Feel free to ask for feedback if you have questions or want more information.
MOOC List is learner-supported. When you buy through links on our site, we may earn an affiliate commission.
MOOC List is learner-supported. When you buy through links on our site, we may earn an affiliate commission.